
Welcome to Episode 6. Please feel free to skip back to Episode 5 if you missed it.
Yes, we were finally ready to install our Airhead toilet!
The day started with a hearty breakfast – sometimes you just know that you need to be prepared for a long day! We also made sure before we removed the old toilet that there was access to the toilet in our marina as just occasionally it is out of action due to water supply issues. All was working okay, so we were good to go!
The first job was to remove the old toilet and sort out the pipework attached to it, that ran from inside the cupboard through to the toilet on the outside.


The pipe proved easy to remove and had an isolator inside the cupboard. We chose not to remove the pipework completely, as if we were to sell the boat in the future it would allow any new owners to revert to a cassette toilet – why on earth anyone would want to do so, I cannot imagine!!
Nick realised that one thing he had forgotten was an end cap for the pipe – if that is all we had forgotten we would be lucky! I quickly wrapped the end with some paper roll and attached a bag over it, even though we were pretty certain it wouldn’t leak with the isolator, but not being visible all the time we decided it was better safe than sorry!
We now had a lovely empty space ready for our new toilet!

Now, when embarking on any major installation, as this was, Nick likes to be fully prepared as I may have mentioned before! He had drawn a template of the toilet base showing the brackets that would need to be screwed to the floor – Airhead if you are reading this it would be great to have one of these in the box with the toilet – as you can see from the photo, our piece of card wasn’t quite big enough to put the full circles on!
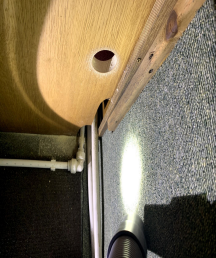
Firstly, we used the template to work out roughly where we would position the toilet so that Nick could drill a hole through for the hose.


Making the hole through proved simple as Nick had the right tool for the job!

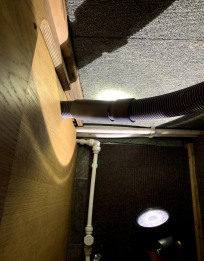
Once I had tidied up we were able to push the hose through the hole ready to attach to the toilet. Nick had cut a small piece of hose off the length supplied with the toilet for the overlander and we used the threaded bug screen cuff to join the two pieces together.
We were now ready to line up the toilet, using the template to show exactly where to fix the brackets. We put the toilet on top of the template in the correct position and were then able to slide the template around on the floor until we were both happy – Nick knows to always let me look to make sure everything is square and lined up, as anything less would irritate me so much that I would drive him mad!!
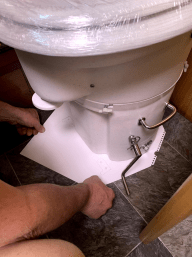
Once in position, the template was stuck to the floor using masking tape, and the toilet was removed. Nick then drilled through the markers on the template to make the holes for the brackets, removing the template before securing the brackets to the floor. (Don’t worry we have kept the template for when we fit our toilet on the overlander!)
We tried to attach the toilet bowl/seat back onto the solids container but discovered it was just too stiff to rotate as per the instructions so Nick used washing up liquid to lubricate the rubber, as it had been extremely difficult to get them apart in the first place.

This lubrication made it easier when we put them together, although it was still a two-person job, as we didn’t want to cause any damage and we were still getting used to the mechanism of attaching the two parts.
There then followed a very heated debate on the instructions of fitting the hose to the toilet and what we each interpreted the correct method to be!! In the end, we watched a video on Youtube via a link from the Airhead US website and decided we would follow this as it was simple and straightforward!
I have since discussed the instruction booklet with our supplier who agrees that this one particular section is not helpful!
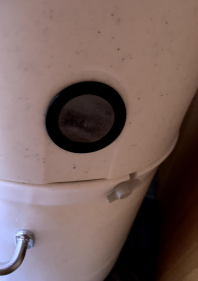
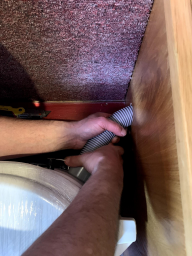
Due to our slight domestic – I am sure many of you have been there at DIY times – I have to confess that I completely forgot to take photos of Nick as he secured the threaded cuff using plumbers glue into the side of the toilet ready for the hose to attach, but you can see below how it now looks with the hose fitted. The remaining hole on the opposite side is filled with a screened breather.

Time to fit the solids container to the brackets, attach the toilet bowl on top, and then fit the liquids container to the front brackets. It was also at this point that we actually fitted the hose into the cuff on the side.

Finally, the toilet was in place ready to use!

STOP!!!!!
In the excitement of fitting the toilet, a job which had taken the majority of the day – due to our heated discussions and video watching – we had completely forgotten to get the coco coir brick soaking ready to put into the solids container BEFORE any deposits were made!!
Fortunately, we had a bucket ready for the job, and on this occasion, Nick had already watched a video on the best method to get the brick to break down, namely soak in water until it is soft enough to be broken into a loose consistency. The top was removed and the coco coir placed into the solids container – we used the whole brick for the coir to reach the suggested level of 1 inch above half full for liveaboards.
Now we were all ready to start using our beautiful Airhead. Come back to read the next blog to find out how we got on with installing another Airhead unit on our overlander (RV).